Sunday, August 3, 2014

Big Shot Promotion

Big Shot Promotion!
 
Buy a Big Shot and receive your choice of one of these Stamp Set and Frame-lit bundles FREE!!  If you all ready own the Big Shot, you can purchase any or all of these bundles at an additional discounted 15% off price.


This special pricing is available till August 31st. 2014.
 
Call me to place your local stamp order
or


Sunday, October 25, 2009

Holiday Extravaganza Stampin' Up! class

So here are three more projects we will be doing at the Holiday Extravaganza Stampin' Up! class. Once again, these projects are done using the "Holiday Collection" stamp set, which was designed exclusively for Country Living magazine last Christmas. I'm still coming up with another 2 or 3 more projects, so check back and see what else will be included in the class. I have 4 more openings, so check out my calendar of events for more details.


Saturday, October 24, 2009

Holiday Extravaganza Stamp Class Projects


So if you are signed up to come to my Holiday Stamping class, these are just a couple of the items you will be able to make. I plan on having at least 15 projects that you will be able to do. I had the opportunity to purchase the stamp sets "Holiday Collection" and the chipboard and papers that were in the Country Living Holiday Collection Stampin' Kit (offered in the Nov. 2008 issue of Country Living Magazine) recently from Stampin' Up!. Everyone that attends the class will get to take home with them the 6 piece stamp set. It includes a star, small snowflake, large snowflake, to: & from:, holiday saying and an "Enjoy" saying stamp. Several of the stamps can be used with our Star, Scallop and Circle Punches. If you have yet to RSVP to the class, do so soon, as I only have 4 spots left. Check out my calendar of events for more details. If you are cming, you may want to bring a couple of your favorite photos's for the picture ornaments.


Wednesday, October 21, 2009

Bigz Top Note Die, Fall Gift Tote


What's great about the Bigz Dies from Stampin' Up! is how versatile they are. On these little totes I cut out 2 Top Note dies from card stock and then cut out 1 from Designer Series Paper, cutting it in half. I used Autumn Traditions and Razzleberry Lemonade DSP on these totes. Add a strip of card stock to hide were the two pieces of card stock comes together, a small saying, I used one from Matchbox Messages and a ribbon. Attach one on each side of a small brown bag, cut it down to size, punch a hole for the handle and voila, a tote to hold whatever. For more information, just give me a shout out. Have a great day & Happy Stamping!


Monday, October 19, 2009

Smore's "Under the Stars"

I just love the set, "Under the Stars". Is this not just the cutest thing? This time of year is always a great time to make smore's and who wouldn't love this boxed set. Shown here it is prepackaged with all the goodies you'll need for that fall camp fire. To make the box, I used my Bigz XL #2 Box die. I cut out 2 from our Kraft card stock, put the backs together and kept the lids up to use as a tote handle.
This stamp set has 10 stamps in it so decorating was a breeze. I'll be making up several of these and will be selling them at the East High School Craft Show, this November 7th. For more info, check out my Calendar of Events in my Stampin' Up! Website. Thanks for looking. 


Sunday, October 18, 2009

'It's Fall, Let's Get Stamping" Class


Here is a card we will be making at my up coming class this week. It uses Lovely as a Tree & Sanded stamp sets. It also uses our chalks. This picture does not do this card justice, it looks much better in person. Check out my Calendar of Events for more details.


"It's Fall, Let's Get Stamping"


Ok, so here is one of the projects we will be doing at my "It's Fall, Let's Get Stamping" Class this Tuesday and Wednesday. This uses our Bigz XL Fancy Favor Box & the Autumn Splendor stamp set. Other items used were the Itty Bitty Backgrounds stamp set, More Mustard & Confetti cardstock and our 1/4" Chocolate Chip Grosgrain. Be sure to visit my Calendar of Events for more details. Hope to see you soon.


Saturday, October 17, 2009

IMDC-1 Halloween Idea's


Ok, so I haven't been doing much on my blog, and to come back with Halloween ideas is not me. No, these are not items we will be making in my upcoming classes next week.
The Basket is made with Stampin' Up!'s Basket and Blooms Bigz xl die in Pumpkin Pie cardstock and embossed with the diamond plate from Stampin' Up's Backgrounds 1 Texturz Plates. The saying is from Holiday Best, a level I hostess set which I colored in with our Stampin' Write Markers and punched out with our Wide Oval Punch, then daubered it with Basic Black Ink. The Ribbon is our new 1 1/4" Pumpkin Pie Striped Grosgrain. This ribbon is so easy to tie, even with its wide width. Love it! Now onto the card; I used Elegant Eggplant, Green Galore, Only Orange and Whisper White cardstock with our Sweet Centers Stamp Set which is currently in our Holiday Mini Catalog. I used our Sweet Treat Cups in the center and filled it with M&M's. The small saying is from the Teeny Tiny Wishes Stamp Set. The ribbon is our 1/4" Pumpkin Pie Grosgrain. Punches used on this card are the 1 3/4" Circle and Round Tab Punch. E-mail me with any questions.


Tuesday, April 1, 2008

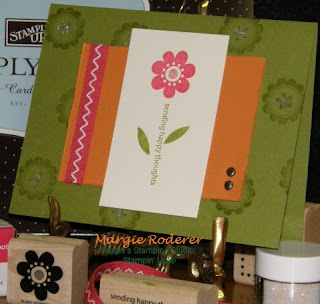
~ . ~ . ~Sending Happy Thoughts~ . ~ . ~ With our Simply Sent Card Kits


Simply Sent Card Kits
~
Featuring
~
Sending Happy Thoughts


All of the pictures in this post show cards that I made with the 'Sending Happy Thoughts' card kit. Being a demonstrator, and having most of the supplies in these kits, I didn't buy them when they were first introduced. I'm so glad I've invested in them now, as they are so much fun and so easy to use.
If you are new to Stampin' Up!, or simply pressed for time, nothing will get you started faster than our Simply Sent kits. Each kit offers a fast, easy way to create cards for a variety of occasions. The die-cut rubber stamps, pre-cut materials, a variety of inks and supplies and a great instructions booklet will help you to start stamping beautiful cards in just seconds.
Each card kit comes packaged in a beautiful box which would also make a wonderful gift. When you open your card kit, you'll be able to start stamping immediately. I started with the step-by-step instructions and made the two cards pictured in the booklet. After making the two cards featured in the booklet, it was so easy to design and make my own creations.


If you are interest in any of the five Simply Sent Kits, that are featured in Stampin' Up!'s Spring / Summer collection, I am offering these kits at a 20% discount till the end of April. Contact me today with your order.

Monday, March 17, 2008

Boho Backgrounds, RAK

OK, so I go out to my mailbox last week and see this clear envelope, you all know which ones I am talking about, I have them too, but I've never sent a card using one. Well I got this one last week from a dear friend, and of course a great stamper.
I just love it! Thank you so much, Deah. I hope you don't mind me sharing it with the world!
As you can see, she used the Stampin' Up!, Boho Backgrounds stamp set along with the Scallop Circle punch, Apricot Appeal, Regal Rose and Very Vanilla card stock, a Regal Rose stamp pad, glitter and some lace and oh, what a beautiful card. Again Deah, thank you so much!!!

Sunday, March 16, 2008

Easter Center Piece

This center piece was so much fun to make. I saw an idea similiar to this on Splitcoast. The first thing is to find a container. I used a clay flower pot and painted it with an acrylic paint, then lightly sprayed it with Krylon® latex enamel. I added a rub on from the Love & Happiness Rub On's in Stampin' Up's, Sale-A-Bration brochure. Using the 5 Petal Flower Punch and the Trio Flower Punch from the Three for you Punch Box, I punched out flowers using Prints Designer Series Paper. Taking a styrofoam ball, I added the flowers using dress pins. I pushed a small dowel up through the bottom center and tied on a few Double Stitched Ribbons. I placed the dowel into the pot and added Easter grass and jelly beans. Any questions, leave a comment and I'll get back to you!


Photo Holder, Using Rub Ons

I found these great photo holders at a local craft store and couldn't resist buying them. I knew Stampin' Up!'s Rub On's would make a wonderful addition to an all ready cute item. I used the Sale-A-Bration, Love & Happiness Rub On's.
Don't forget, Monday March 17th is the last day of Sale-A-Bration! There is still 1 day left to earn free stamps with every $50.00 spent.


Wednesday, January 30, 2008

A Light unto My Path


No, this is not the same layout, but it is close! I borrowed my friends Scor-Pal and Scor-It yesterday to see which one I like best. While visiting the Scor-Pal's website I saw a grid card done by Judy Jackson. It inspired me to try this with my new Stampin' Up! set, A Light unto My Path. I first scored around the outside of a So Safron card 1/2" from the edge. I also scored a 3 x 4" piece of Confetti White card stock in 1/2" intervals. Seeing how this was a sample I did not think I would be finishing, I used my Elegant Eggplant Ink to stamp the lighthouse. (I did cut it down a bit to fit the stamped image) I colored it using my Pure Color Pencils, roughed the edges, added some layered card stock, Grosgrain Ribbon and the saying at the bottom. I love how it turned out.
What do you think? Also, what scoring tool do you like best? Any feed back would be greatly appreciated.


Tuesday, January 29, 2008

Nursery Necessities, Baby Card

Another card using the same layout, this time with the Nursery Necessities Stamp Set. I'll give my card stock measurements on this one. Almost Amethyst, 8 1/2" x 5 1/2" folded in half to make a card. Prints Designer Series Paper, 3" x 4 1/4", Rose Red, 2 1/2" x 3 1/4", Pumpkin Pie, 2 3/8" x 3 1/8" & 4 1/4" x 3/8", Whisper White, 2 1/4" x 3". Also a scrap of white for the saying punched out with the Word Window punch. Once again I used my Stampin' Write Markers along with the Almost Amethyst ink pad and then added two Vintage Brads. Oh yes, on this one I used my Ticket Corner punch on the layered pieces. Everything is by Stampin' Up! Thanks for looking!

Monday, January 28, 2008

Big Bold Birthday card

Ok, so here is yet another card using the same layout as the previous two post, only this one I used the Big Bold Birthday set. I started out with a Pumpkin Pie card and added Designer Series Paper. I hope to add one more card tomorrow using the same layout and will try and post the measurements as well. Thanks for looking and have a great day.

Sunday, January 27, 2008

Close as a Memory, Sympathy Card

Here is another very quick and easy card that is very elegant. If you look at the card I posted on Friday, you'll see that they are basically the same, only they use different stamp sets and card stock. I used Close as a Memory stamp set and the Jumbo Watercolor Vine Wheel and Handle. Using a River Rock textured card, I added Not Quite Navy, Pumpkin Pie and Confetti Cream Card stock for layering and stamping. Other accessories were River Rock Double-Stitched Ribbon, Stampin' Write Markers, Earth Elements Brads, Mellow Moss cartridge and Not Quite Navy ink pad. Have a great day and take time to make and then send a card.

Friday, January 25, 2008

Never Ending Joy

I think the set Never Ending Joy could be used for just about any kind of card, Easter, birthday, get well, sympathy, Mother's Day and I'm sure you could think of other occasions. The saying on this card came from the set, Holidays & Wishes. I started out with a Pretty in Pink card, added Gable Green Textured card stock and Chocolate Chip Grosgrain Ribbon. Coloring direct to the stamp with my Stampin' Write Markers, I stamped the image onto Whisper White card stock and then layered it onto Pretty in Pink and Chocolate Chip. I stamped the saying in Chocolate Chip and added Brads from the Bold Bright Collection. Needless to say, all products are from Stampin' Up!

Tuesday, January 22, 2008

Rub-Ons, Eastern Elegance

I started collecting teapots soon after I was married 34 years ago. When I saw these Rub-ons in the new Stampin' Up! catalog, I knew I would be trying them on a few of my plain jane pots. On this black teapot, I put the fine stitching all along the bottom, I then added the flower in the middle, adding a smaller flower to the lid. It was perfect having both black and white rub-ons to use.

Now on this green tea pot, I just added the flower burst in the center with two smaller bursts on each side. I have several of this style teapots, and will have to pull out a few more to do.

This white teapot I just picked up in a pottery store last week in Greenville, SC. I bought it with the intentions of giving it away after decorating it. It was only .89 cents and I only bought one. What was I thinking?


Hope you've enjoyed these samples. What fun it was designing them and very easy to apply. I'm looking for a pitcher to do next. Thanks for looking and leave me your comments. I would love to here what you think!


Monday, January 21, 2008

A Valentine Mini Photo Album

This is a mini photo album I made for my husband on Valentines Day last year. I used 3 1/2" coasters for the cover. All of the stamps and papers used are Stampin' Up! Many or should I say most of the sets used are now retired. The LOVE on the cover was a hostess appreciation set, "Love is a Great Thing". It is from the 2001 Winter Mini Supplement. This was one of my first Stampin' Up! sets and one of the many reasons I signed up that February to be a Stampin' Up! Demonstrator. I used Craft ink on white shrink plastic for the love, cut it apart and then used my embossing gun to shrink it.
All the other stamping is done with our Classic Ink pads or Stampin' Write Markers. After stamping the images or sayings, I covered them with the Versamark Pad and then with Clear Embossing powder. After heat embossing them it left a shiny finish which will protect them for many years to come.

To make the inside pages I used a 12 x 12 sheet of Basic Black card stock. I saw this technique on The Scrapbook Lounge, on TV Weekly.com

You can see that I had pockets where I added special notes. The tabs for these notes are stamped images that I also did with shrink plastic.
Also used on many of the pages are Punches. These pictures were taken in those vintage photo booths that were everywhere in the 70's. You would go in the both, pull the curtain shut and get 4 photos for $1.00. As you can see, more shrink plastic!
On these pages I used the highlighting technique. I like doing this to help the eye be drawn to the main image. Punch out the image with a smaller punch then punch out a coordinating piece of card stock 1/8" bigger and then layer onto picture.
These were all pictures of me from larger 4 x 6 in prints. Again I used the 1 1/4" punch and then the 1 3/8" punch for layering.
On this last page, here's Me and Ted at Stampin' Up!'s Manager's Reception in Houston, Texas last year. He went to Leadership with me in January, 2007. We took in other sights of Texas while there which included the Alamo.

I hope you enjoyed this mini album and I hope you give it a try. The hardest part to this entire album was going through all the photos looking for pictures of me. I'm the photographer in our family and there weren't to many to choose from. I would love to here from you, and as always, would love to answer any questions you may have. Feel free to E-Mail me!